Thursday, October 25, 2007

Happily Ever After


I have been trying to use up some 3D embellishments and find that they work very well on cards. This is a card I did for a friends' sons wedding. The paper is SU Going Gray and Whisper White. The printed paper with the gray hearts is an 8 1/2 x 11 paper found at Hobby Lobby.
The stamp is a $1 one from Michaels and is stamped in SU Pretty in Pink. The heart I colored in with P in P using a blender pen and covered it with crystal effects. The hearts are "destination unknown" Just one of those things that has been around for awhile!!! I popped it up on the card. Inside is stamped "Congratulations on your Wedding"

Tuesday, October 23, 2007

Sam's thank you

My awesome friend Sam, makes nightlights for every occasion. She recently made me a pumpkin for the season. I have sent her this thank you for it that I created myself. I am going to send it to some publications and hope for the best. I got the pattern from googling pumpkin patterns and then made it pull up with the sentiment inside. I used SU pumpkin pie; the leaves are Prima and floral green wire creates the vines. The stem is a textured paper from Joanns
and I sponged the edges and created the stitching with a close to cocoa marker.


The night light was stained glass and so the sentiment inside says:

colored glass: $10 lead $5 wire $1 creative talent for a finished pumpkin - priceless!

Birthday cards

I have so many birthday's this month and here are the cards I created (I used two of them twice)
1) This card was done using a TAC stamp (Ooopsie daisy)from my friend Sam. I stamped the image in black and colored in the leaves with certainly celery using a blender pen. I used liquid applique (white) for the petals of the flowers and sprinkled dazzling diamonds (SU) before it dried. I used gold stickles for the centers of the flowers. The paper was from SU (certainly celery and whisper white). The embossing is from cuttlebug embossing template. The "happy" and "birthday"(inside) were done by the rolling technique ( stamping the image first in certainly celery and then edging in black.).
2) This card was done using a daisy flower punch; cuttlebug embossing spiral plate for the leaves that were cut by hand. Paper is certainly celery from SU and another paper from Michaels.
The stem and happy birthday are stitched rub-ons.
3) This card is done using SU barely banana as the background. A printed paper from Michaels, and a textured paper from Joanns. The birthday stamp is from Paper Inspirations..
My friend Lois over at gingerbreadaholic sent me a link to a site that made these cute little boxes filled with York Peppermint Patties that were covered with cut out circles. I can't remember the site but I only used her idea and made the boxes differently. Below is the pattern I created and how I did the box and decorated the patties.
Cut a piece of cardstock 5 x 11 inches. Fold in half the long way to get a 2 1/2 x 11 piece. Open up and score every 2 5/8 inches to get 4 squares. There will be a 1/4 inch left at the end.
Cut up from the bottom of each square to the fold line. Fold on the scored lines at the top. Fold in each cut square to make a box and glue together. Glue the 1/4 inch to the inside of the box.
Attach a 1 inch strip (any length you want) for the handle.
Using several size punches, make circles or scalloped circles to cover the pattie. Sandwich the pattie between the punched shapes. (See samples)

Wednesday, September 12, 2007

Teacher's Cards


My husband who is retired and is now a substitute teacher is subbing for a teacher whose father just died. My husband asked me tonight if I could please make him 2 large sympathy cards that the kids in his 2 classes could sign. Of course he needs them tomorrow! Well, it is near my bedtime but of course I was thinking that with all this "stuff" I have, I should certainly be able to come up with something. Well, here are my 5 minute results. The first card is some awesome masculine paper that I found in my stash of go togethers. (Yes, I do have a file of papers that I consider go-togethers - 2 or more papers that match) This paper is from The Paper Studio called Black Brown Tiles, and Black Brown Argyle. The inside is a taupe from those Stack Packs at Joann's and is stamped with the sentiment from The Stamp Doctor (stampdoctor.com). The ribbon is a black/beige check from Michaels. The base of the card is vanilla. The ink used is SU Close to Cocoa.


The second card is SU bashful Blue background; Close to Cocoa for borders and the paper is Courtyard Flowers from Chatterbox. The stamp inked in Close to Cocoa is from Paper Inspirations. Brown brads from a collection at Joann's rounds out the corners.

Monday, September 3, 2007

Weekend Projects
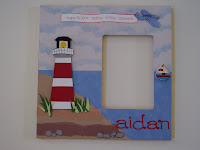


I have gotten a job working in a reading program at a local K-3 school so have not had much time to devote to this blog. However, my daughter, Jenne, was in town this weekend. She has a severe case of carpal tunnel so couldn't do too much. She needed a frame and some cards so this is what we did.
This was a wooden frame from Michaels, which the recipient will put in a picture of her little one. We created the lighthouse from a stencil and just added pieces. The dirt was just torn pieces of paper and the boat was a wooden one from Michaels. The airplane was from Clip Art and the background paper was just some from Michaels also.


These 3 cards were 1) an underwater scene for the big brother of Aidan (who is getting the frame above). Jenne bought him a book and Nemo stuffed animal and we made this card to go along with it. We got the Nemo from Clip Art. The seaweed is just stamped and cut out on bashful blue and brown torn paper. Inside Nemo says I am the big brother and we also put a little goldfish that says Hi Big brother. The 2) is a trifold card using Baby Boy paper from JoAnns and Brocade Blue and some funky star brads I just happen to have a million of in several colors! This card was for the parents of Aidan and his Big Brother. 3) is a birthday card for Jenne's boyfriend Corwin's niece. She loves butterflies and we were looking on line on Splitcoast and saw a similar card-can't remember who to thank for this! We just drew dots, added tiny prima flowers, and stamped a butterfly and popped up a duplicate on top. This is a $1 stamp from Michaels. Anyway it was a very productive weekend!

Sunday, August 19, 2007

Embellishment Challenge

How many embellishments can you put onto a card? Here I have a card using Bashful Blue for the card base. Courtyard Print (2 sided) from Scrapbook Walls is used on the background and the brown ovals cut from SU's large oval punch, and the blue oval from the smaller oval punch. The flower is Courtyard Flowers from SW also. The flower is made by cutting a piece of paper 1 1/2 inches by 10 inches scored every 1/4 inch. Then accordian fold and fan so that the 2 ends go together. This is tricky but you have to hold it flat on your surface. Glue those two ends together. It will keep popping up until you flatten it on your card! I used double-sided tacky tape to really hold it down. I added a 3/4 inch circle that I punched out and covered it with a clear page pebble and a large brad. The "for you" is from SU "fun filled" and the happy birthday is from Memories in the Making rubber roll stamp. The photo turn is from JoAnn's and the brad is SU's bashful blue. The ribbon is ???(just from my stash!) The eyelets in the upper corners are really brads . So in this challenge I have used;
ribbon
eyelet brads
brads
photo turn
page pebble
Now it is your turn. Feel free to pass this around to all the bloggers you know and send me a photo or link to your card. At the end of the week I will post all my entries and have you the viewers pick the winner.

Friday, August 17, 2007

What Your Pizza Reveals

People may tell you that you have a small appetite... but you aren't under eating. You just aren't a pig.

You are a very picky pizza eater. Not any pizza will do. You fit in best in the Northeast part of the US.

Your taste is rather complex and sophisticated. You consider yourself a gourmet - and a bit of a snob.

You are dependable, loyal, and conservative with your choices.

You are deep and thoughtful. You should consider traveling to Paris.

The stereotype that best fits you is hippie. You knew it was coming.

Because Nice Matters


I have been nominated for the Nice Matters Award and so now I must nominate 5 bloggers that are worthy. Well, actually there are hundreds but 5 is a nice easy number! Before I give you my names I must show you the plaque that my friend Lois over at gingerbreadaholic gave me last year. I feel like I've been given the same award twice and am honored. Of course Lois is my first choice. She is one of the nicest people I know and is always there when I need her advice; help; or just to spend time together. My other 4 nominees are Samm, Malieta,: Cheryl: and Allison , all who leave me wonderful comments on my blog;

Wednesday, August 15, 2007

More 2 for One


Here are 2 more samples of 2 cards using 1 stamp and the same papers. I also noticed that the card with Joy to the left is SC's sketch challenge today!!!

Tuesday, August 14, 2007

Get Well Connie

My friend Connie has had some serious operations lately and I thought she needed something to bring back her great sense of humor. This card is the result. I know it will bring a laugh. Get well Connie. I love you!!

Same Stamp/Different Cards


Last night I was surfing the blogsites and came across one that had a challenge to create 2 cards using the same stamp. Well, I thought that was a great idea and kept it in my head until this morning. I created these 2 cards but have no idea where I saw that blog. I went back into several but to no avail. If any one out there knows what site it may be, please let me know so that I can submit these 2 cards. Thanks fellow stampers. You are the best!

Monday, August 13, 2007

Check out Cheryl's site for some great blog candy. She's a keeper to add to your blog list!

Love My Cat

Are there any cat lovers out there??? I'm sure there are! Well my daughter Jenne's cat, Price Tag, aka P.T. has been with "me" for 17 years. She received him from Auntie Debbie at age 13. (Auntie Debbie, by the way, never asked if we wanted a cat!) Well Jenne grew up and went to college; moved to an apartment in San Diego, and has never been able to take care of the cat. So, although he technically is hers, I am Grandma (this is my only grandchild as of yet!!!) and I have had him for 17 years. Last October he was diagnosed with bone cancer and the doctor did not believe he would make it till Christmas. So, I made her this scrapbook of his life to give to her to remember him. Well, it is now August and he is still with us!! The doctor is amazed, that he has lost half of his weight, but is still hanging in there. He doesn't look or act sick so I am thinking that he is on one of those 9 lives (not sure which one though). The last page of the book showing then and now is a picture of Price Tag when we left our home in Massachusetts (the only home he ever knew) to our home in Arizona. Well, I gave her the book before we took a picture of him on our patio out here to put in. Jenne has it now and has put a picture in.
I must have her send me a copy of that page.
This book was put into a pizza box. The first picture is the cover of the pizza box (with PT as head of the house) and the 2nd picture(PT on a quilt) is the inside cover of the box and the 3rd picture (yellow with brown ribbon) is the cover of the book. Enjoy!
I'd love to see your scrapbooked cat too!!!

Check out my Slide Show!

Monday, August 6, 2007

Winner Announced

Thanks to all who entered. After a random drawing Cheryl from mum-on-the-run has won the challenge. As soon as I hear from her a special "black" package of goodies will be sent.

Sunday, August 5, 2007

More Halloween


Okay, so I have been going crazy with this new SU Halloween paper. But, luckily, it is almost gone!!! These are 4 cards that I created using the "Batty For You" stamp set and the "Bitty Boos" stamp set. The first card I created the saying which is on a pocket. The BOO is a tag that goes into that pocket.(If you can't read it, the saying is: Gouls & Goblins, Witches too, All so scarry, LOOK OUT! and then you pull out the tag that says BOO). The bottom is embossed using versamark and black embossing powder and the jumbo "Spooky Skyline" wheel. The 2nd card is a small white bag, creating a pocket, that I just inked. The tag with the scaredy cat stamp also goes inside the pocket. The sayings paper on the 3rd card was from last year's collection(?) and the 4th card I used the mega scalloped circle punch, cutting it into 4 pieces, to make the corners. What are you creating for Halloween???? I'd love to see.

Thursday, August 2, 2007

Halloween Wallet Card

This is my rendition of a wallet card that I got from Ana's blog inkastamp, in which she did the tutorial. Thank you Ana (now I don't need to do one). This was very fun to do and I have so much Halloween stuff hanging around that I thought I would put it to use.
The first picture shows the outside front; 2nd picture the tab folders that pull out from the front pockets; 3rd photo the inside when opened; the 4th photo the inside with the tab folders that pull out from the front and back covers; the 5th photo is the back cover with the pull out folder.
Sound confusing???? It won't when you make this very easy project.
I used the new SU halloween paper; basic black; and pumpkin pie. All the stickers and embellishments are from all over. I've had them for quite awhile. Give this wallet card a try-it is really cool!

Check out my Slide Show!

Black Flower Challenge


Three more days to take this challenge (see below) I will be picking a winner on Monday August 6. Thank you to everyone who answered the challenge.

Saturday, July 28, 2007

Halloween Recipe Box


I have been going through some old magazines for different ideas for Halloween creations and came upon this in last years October, Paper Crafts magazine (pgs.15-17). It was made as an invitation to a Halloween party, but since I am not having a party for Halloween anytime soon I decided to put the recipe on the pull out. Kinda cute for a little housewarming gift if you bring the "brew". I used Pumpkin Pie for the base; the handle is SU's chipboard that I covered with paper and cut out with an X-acto knife; the witch's legs are from Making Memories Halloween glitter stickers: and the Brew bubble letters were from the dollar store. (If you haven't checked out your local store yet, hurry on over. They have great deals on lots of scrapbooking stuff) On the inside I typed the recipe from pg. 15 and printed it on a piece of Xerox paper so that it would roll easily. If you don't have the magazine the directions to make this are as follows:
Cut a piece of cardstock 8" x 3".
Score at 1/2", 2 1/2", and 5 1/2".
Using your X-acto knife, cut a 2 1/8" slit across the 1/2" fold.
Fold the 1/2" strip down and fold on the other score lines bringing the end up and under your 1/2" fold.
Secure with brads.
Embellish as desired.
Glue handle to typed recipe; roll up and put into the now triangle folder and bring handle up through the slit.
Now pull and out comes your recipe!
Black Witches Brew recipe: 1 each of 13 oz. envs. of unsweetened grape and orange drink mix.
2 cups sugar; 3 quarts cold water; 1 liter gingerale (chilled)
Stir together the mixes; sugar; and water until dissolved. Add gingerale.
Serve to all the gouls and goblins!


CHA RAK GIVEAWAY

Check out this site for a fantastic giveaway from Spazzgirl.

She Rocks!!

Wednesday, July 25, 2007


I have been looking at the Scor-pal and wondering if I really need it. Well, I know I don't really need it!!!! but should I get it!. The site (http://www.scor-pal.com/) has many cool ideas and this is one of them. I have also seen it on a Splitcoast tutorial. Another easy box to put together.

Tuesday, July 24, 2007


Black Flower Challenge


I bought these beautiful fabric black flowers (can't remember where though) and wondered what I would ever do with black flowers. Well, I have a friend who just had surgery and went to visit her today and made this card for her. The background is cuttlebug's textile embossing folder. So, I have a challenge for all of you to create a card using black flowers. I would love to see your ideas and will reward 1 person (randomly drawn).

Saturday, July 21, 2007


I recently went to visit my sister in Palm Beach, Fla. who has a condo on the ocean. She is not a scrapbooker, so I tried to convince her that scrapbooking is the way to go. I made this chipboard book for her which is inside a pizza box that I purchased from Jen, at Just4funcrafts.com. I don't think she is into scrapbooking yet, but she loves the memories we made.


Here are a few more pictures from the Florida scrapbook.


MS. SUNSHINE

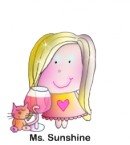
Do I have to explain my little "blessthischick"? Probably not but it helps to know a little more about me. I have always wanted long blonde hair that shines. I have a 17 year old cat named Price Tag who is orange and white. I love red wine - sometimes too much!!!! I love having a tan which I get very easily. And the heart on my dress is because I love so much. I wanted to add a rubber stamp but it wouldn't let me get carried away. Check out this site. It is soooooo cute.

Just thought I would show you a couple more boxes that I have made in the past.

TRICK OR TREAT

This box pattern has been around for quite awhile but I just love it. It is perfect to make for last minute gifts i.e.: birthday; housewarming;appreciation; etc. It goes together so easy and the possibilities for creations are endless. If you don't have this pattern, I will be happy to send it to you. Lois from gingerbreadaholic, gave me this feet stamp and I was at a loss of what to do with it. When I got the new "Batty For You" set, I had my answer (Trick or Treat-Smell my Feet).
I also used the bat stamp for my handle from the retired SU set "Halloween Backgrounds" and the new SU double-sided Halloween paper. Inside the box I made a topper for a plastic bag that holds the candy(using the font "stiltskin") and cut up pieces of crimped Pumpkin Pie for the confetti. This is a great trick when you want to use a filler inside a box.

Friday, July 20, 2007


Christmas In July


I just love this saying! It is sooooo hot here in Arizona-20+ days of over 110 degrees so far. I am from Massachusetts so I remember the cold and even though I would never live there again I can still feel its presence. So, this Christmas in July theme suits me fine. Here is the first of my "winter" cards (because I don't think snowmen are necessarily a Christmas theme). Stayed tuned for more to come as the weather gets hotter here For this card I used Ballet Blue; Certainly Celery and the set "Festive Favorites" This is one of my favorite "cute" sets. I colored in the snowmen with these great paints called "Jewels Watercolor Palette" from US Art Lest. They are pearlescent and Metallic colors similar to Pearl Ex. They are arranged in a palette formation so all you do is wet your paint brush. Included is a misty lavender and spring green which matches these two SU colors perfectly. I added a scalloped white border; ribbon from Michaels and a metal snowflake brad and plastic 3D snowflakes from ???, and the blue ribbon is SU's bluebird(?). Send me some of your Christmas in July cards-I would love to see them.

Thursday, July 19, 2007


Create your own newspaper article. How cute is this. I got it from my friend Lois at gingerbreadaholic. Thanks Lois, you are my computer wiz idol!!!


For quite awhile I have had my eye on the Hero Arts "decorative birds" stamp set. Then I was
organizing (again!) and found that I already had TAC's stamp set "basic birds" which is very similar. So, I created these cards: 1 for my friend Joanne's birthday and the other for a friend back East (that would be the Boston area - Go Red Sox!) who is an avid birdwatcher.


Do you all remember when last year (or maybe even earlier) that decorating matchboxes was the rage? Well I thought I would share with you two matchbox creations because I think they should make a comeback!! This is one that I did by stacking the boxes (6 to a stack) reversing the order to make a cube. There are 2 squares of chipboard on the top and bottom to hold it all together. I covered all areas that could be seen with Christmas paper. The front of each box has a large brad that makes it easier to open. There are 24 boxes in the cube so you start opening them on Dec 1, and the last one on the top is opened on Dec 25. Hershey "Treasures" fit perfectly in the boxes, but you could also do brads, eyelets, etc. for your stamper friends; or customize for someone special like your child's teacher. What a fun project! If you would like directions, please email me.

Wednesday, July 18, 2007


I am tired of forgetting everyone's birthday so I bought this 4 x 6 photo album from Michaels and created separate pages for each month. (6 months on one side and 6 months on the other side). When I gather up everyone's birth dates, I will put them on the file card. This doesn't take up much space and the file card is easily removed if I have to add more names.